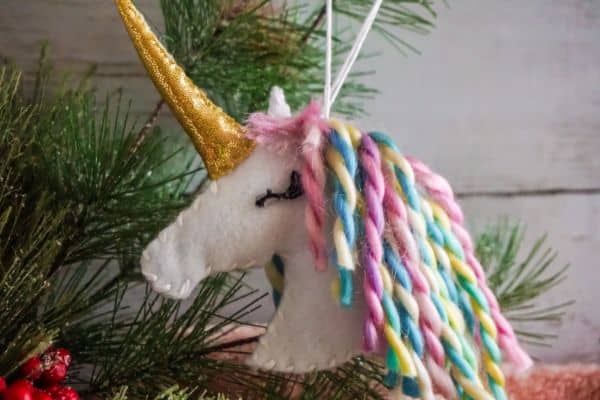
Check out this adorable DIY Unicorn Christmas Ornament. It is easy to make with a free SVG cut file for your Cricut. Your daughter, granddaughter or another little girl will love hanging this on the tree this year.

- IS THIS UNICORN ORNAMENT HARD TO MAKE?
- SUPPLIES FOR A UNICORN ORNAMENT
- TOOLS NEEDED FOR A DIY UNICORN ORNAMENT
- HOW TO MAKE A DIY UNICORN CHRISTMAS ORNAMENT
- STEP ONE: USE CRICUT
- STEP TWO: MAKE HORN
- STEP THREE: MAKE EYES
- STEP FOUR: ADD EYES TO UNICORN
- STEP FIVE: ASSEMBLE HEAD
- STEP SIX: ADD HORN
- STEP SEVEN: MAKE MANE
- STEP EIGHT: ADD HANGER
- DIY UNICORN CHRISTMAS ORNAMENT PRINTABLE INSTRUCTIONS
- DIY Unicorn Christmas Ornament with Cricut
IS THIS UNICORN ORNAMENT HARD TO MAKE?
This is a medium-level craft project. It doesn’t require any super skills, but will take a little time to complete.
If you aren’t familiar with how to do a whip stitch you might want to learn that by checking out this very simple tutorial.

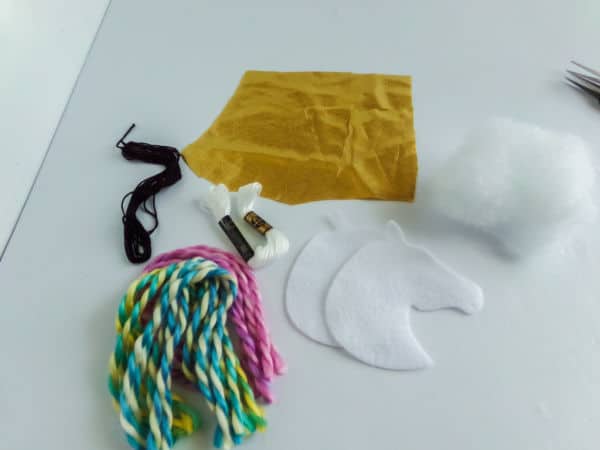
SUPPLIES FOR A UNICORN ORNAMENT
This DIY felt unicorn ornament is so sweet and worth every minute it takes to make it.
Here are the supplies you need for the project:
- Craft Felt in White
- Small Amount of Poly-fil
- Small Amount of Black Yarn or Embroidery Thread
- Rainbow Colored Yarn
- Gold Lame Fabric Scraps
- White Embroidery Thread
- Copy Paper
TOOLS NEEDED FOR A DIY UNICORN ORNAMENT
This Christmas ornament craft requires some basic tools. I used my Cricut for this DIY project, but you could also use another cutting machine that allows you to upload an SVG file.
- Cricut Explore Air2 or Cricut Maker
- Fabric or Light Grip Map
- Hot Glue Gun & Glue
- Pencil or Chopstick
- Parchment Paper
- Embroidery Thread Needle
HOW TO MAKE A DIY UNICORN CHRISTMAS ORNAMENT
This DIY Unicorn Christmas Ornament has multiple steps, but the steps are easy and it is an enjoyable project.
STEP ONE: USE CRICUT
The first step is to upload the free SVG file to your Cricut Design Space.
Click this link to download the SVG cut file: Unicorn Ornament SVG Cut File
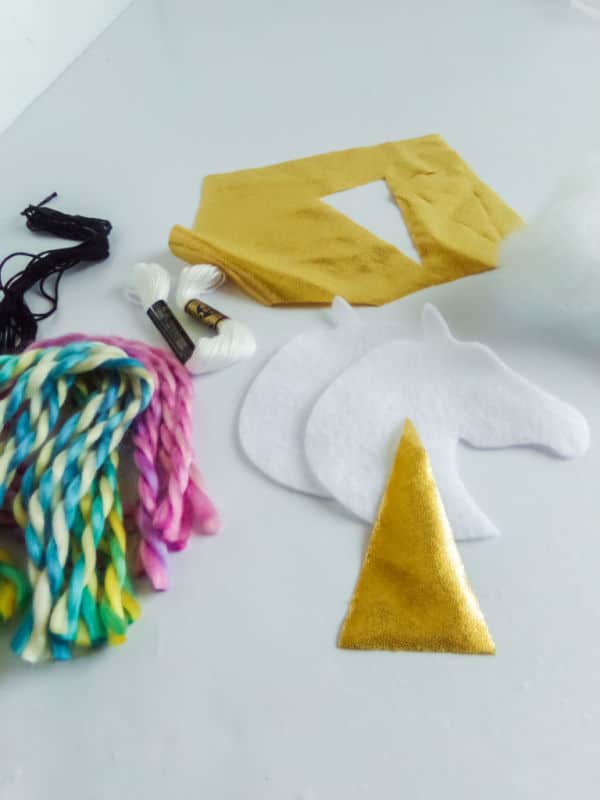
Now use Cricut Design Space to cut out the following items using the provided cut file:
- Two unicorn head shapes from white felt
- One unicorn horn shape from gold lame fabric
- One mane guide from copy paper
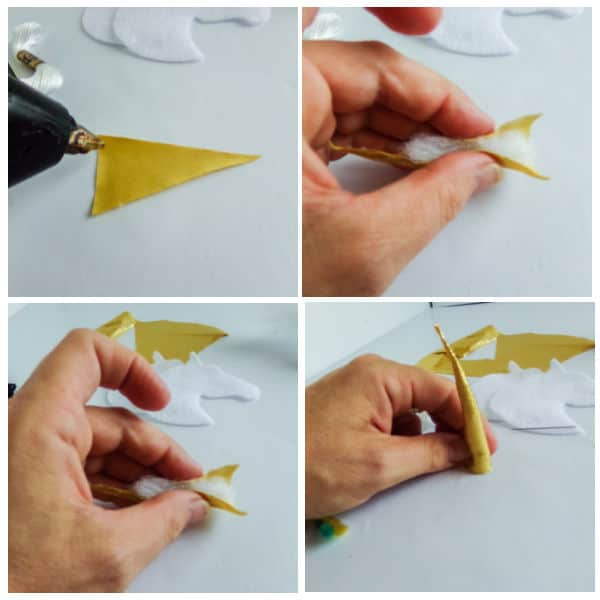
STEP TWO: MAKE HORN
Now start making the unicorn horn.
Place a small amount of polyfill in the center of the unicorn horn shape on the wrong side of the fabric.
Wrap the horn shape around the polyfill then use the hot glue to create a seam along the join line of the horn.
If you would prefer to not use hot glue, you can use a whip stitch to complete the horn.
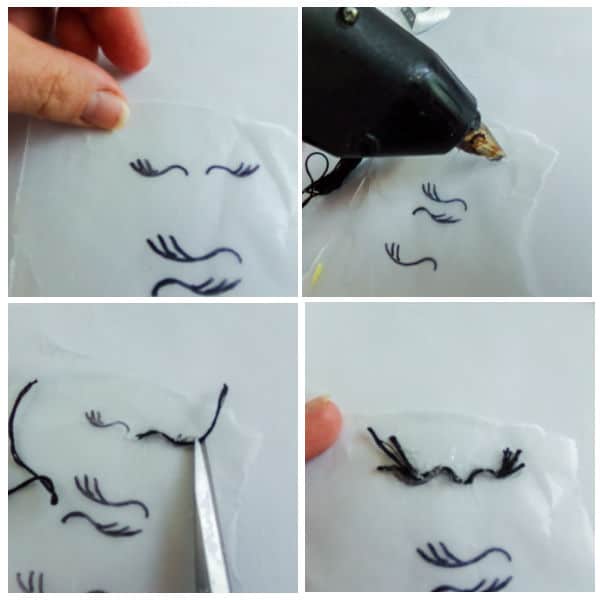
STEP THREE: MAKE EYES
To make the closed eyes, use the hot glue to draw an eye shape on the parchment paper, then immediately place a line of black yarn or embroidery thread on the shape.
You can use pliers or a needle to move the thread around to form the shape better before the glue cools.
If you want you can add more eyelashes or even make them super exaggerated then trim them to suit your unicorn when the glue is fully cooled.
It takes about 5 minutes for the glue to fully cool.
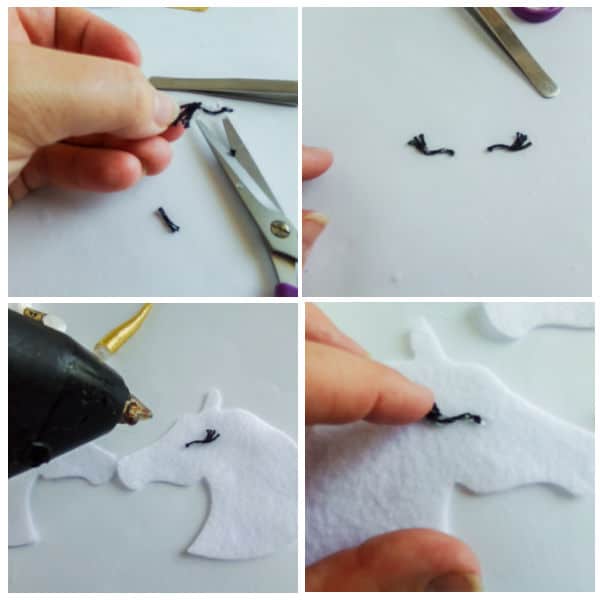
STEP FOUR: ADD EYES TO UNICORN
Now carefully cut the eyelashes out.
Glue the eyelashes in place on the two unicorn head shapes. Be sure to take care to place them on the opposite sides from each other.
STEP FIVE: ASSEMBLE HEAD
Place the two unicorn head shapes together back to back.
Use the white embroidery thread to stitch around the outside edge of the two shapes along the lower face, neck and base using a blanket stitch.
Leave the forehead and all along the neck open for now.
Stuff the unicorn head shape with the polyfill.

STEP SIX: ADD HORN
Place the horn into the open forehead area and whip stitch it in place.
You could also use hot glue to secure the horn in place.

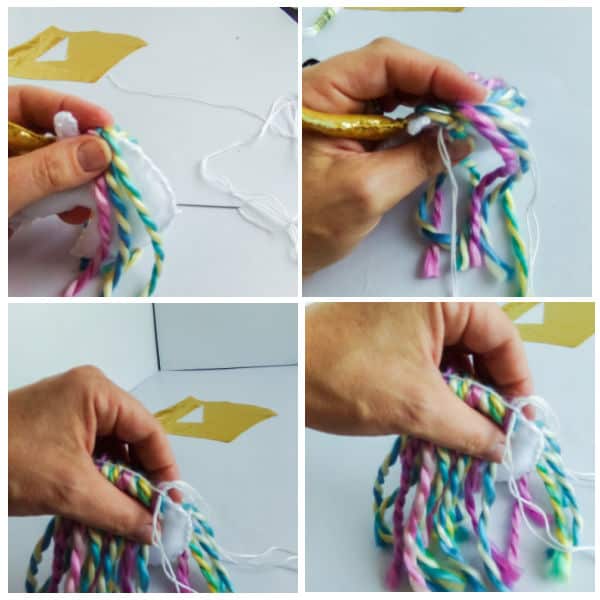
STEP SEVEN: MAKE MANE
Cut the yarn to length using the mane guide paper cutout.
Insert about ¼ inch of the yarn in between the head shapes along the neck back and between the ears.
Whip stitch or blanket stitch the two head shapes closed along the mane, through the mane so it secures the yarn in place. The stitch doesn’t matter because it won’t show so just do whichever is easiest for you.
Tie off the thread and trim the end.
Trim the mane to your desired length.
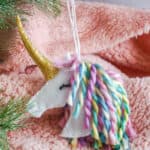
STEP EIGHT: ADD HANGER
Add a loop of yarn to the top of the head behind the ears to hang your ornament on the tree!

DIY UNICORN CHRISTMAS ORNAMENT PRINTABLE INSTRUCTIONS
You can print off the supplies, tools and instructions for this Christmas craft project via the printable card below.
DIY Unicorn Christmas Ornament with Cricut
Equipment
- Cricut Explore Air2 or Cricut Maker
- Fabric or Light Grip Map
- Hot Glue Gun & Glue
- Pencil or Chopstick
- Parchment Paper
- Embroidery Thread Needle
Materials
- Craft Felt in White
- Small Amount of Polyfill
- Small Amount of Black Yarn or Embroidery Thread
- Rainbow Colored Yarn
- Gold Lame Fabric Scraps
- White Embroidery Thread
- Copy Paper
Instructions
- Start by making the unicorn horn. Place a small amount of polyfill in the center of the unicorn horn shape on the wrong side of the fabric. Wrap the horn shape around the polylfil and, using the hot glue or with a whip-stitch, create a seam along the join line of the horn.
- To make the closed eyes, use the hot glue to draw an eye shape on the parchment paper, then immediately place a line of black yarn or embroidery thread on the shape. You can use pliers or a needle to move the thread around a little to form the shape better before the glue cools. You can add more eyelashes or even make them super exaggerated then trim them to suit your unicorn when the glue is fully cooled (about 5 minutes).
- Cut out the eyes and then glue the eyes in place on the two unicorn head shapes, taking care to place them on the opposite sides from each other.
- Place the two unicorn head shapes together back to back and with the white embroidery thread, stitch around the outside edge of the two shapes along the lower face, neck, and base using a blanket stitch. Leave the forehead and all along the neck open. Stuff the unicorn head shape with the poly-fil.
- Place the horn into the open forehead area and whip-stitch it in place or glue in place.
- Cut yarn to length using the mane guide paper cutout. Insert about ¼ inch of the yarn in between the head shapes along the neck back and between the ears. Whip stitch or blanket stitch (whatever is easiest, because it won’t be visible) the two head shapes closed along the mane, through the mane, and securing the yarn in place. Tie off the thread and trim the end. Trim the mane as desired.
- Add a loop of yarn to the top of the head behind the ears to hang your ornament and enjoy it!
If you loved this fun Christmas ornament craft then be sure to check these other great ideas out:
- DIY Reindeer Ornament with Free SVG
- Easy DIY Candy Sprinkle Ornament
- DIY Wood Slice Ornament
- Easy DIY Santa Belly Ornaments
- Free Printable Unicorn Christmas Coloring Page
- Fancy Unicorn Christmas Cookies Recipe with Step by Step Photos


Leave a Reply