Are you ready to learn how to make a snowman Christmas tree? This is a fun and festive way to give your home a new holiday tree and a whole new look!

FUN PLACES TO DISPLAY YOUR SNOWMAN CHRISTMAS TREE
There’s always more room in the house for holiday decor, right? The great thing about making this Christmas snowman tree is that you can display it anywhere inside, or outside the house.
I think that this would look great next to any door on the floor or even on a shelf or mantle. Since it’s not super tall, you can put it anywhere that it would fit.
The most popular place to sit this snowman craft would be on your front porch. This is a super simple holiday craft that is so festive and fun!

SUPPLIES
Just gather up this list of simple supplies needed below to get started.
- Tabletop Christmas Tree
- Evergreen Branches
- White Fleece Fabric
- Scraps of Black, Red, and Orange Felt
- Santa Boot Planter
- Rocks
- Cardboard
- Floral Wire
- Poly Fill
- Fairy Lights
- Black Beanie Hat
- Black Buttons
HOW TO MAKE A SNOWMAN CHRISTMAS TREE
Once you get started on this fun Christmas craft, you’re going to want to keep that momentum going to make even more!
Step One: Cut the cardboard
Grab the cardboard and cut it to fit on top of the rocks. Try to make it close to the size of the top of the boots and use it to create a flat surface. This will be what your tree sits on.
Step Two: Fill the planter
Fill the planter with rocks. If you want to glue them to hold them in place, you can. Add a little bit of the Poly-Fil on top and add rocks around that.
Step Three: Glue the cardboard
Glue the cardboard cut-out on top of the boots. Then put the bottom of the tree on top of the boots and glue it securely into place.
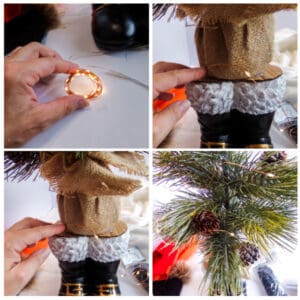
Step Four: Add the fairy lights
Grab the fairy lights and put them around the bottom of three. Work your way up while wrapping them and make sure that you leave a switch for the lights behind the top of the boots.
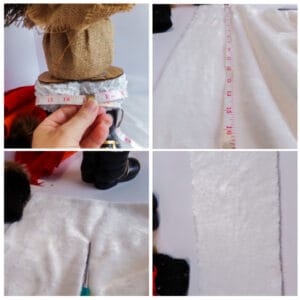
Step Five: Cut the fleece
Using your scissors, cut the fleece into 1/8 yard width strips. Make sure that you cut one of the fleece to be long enough to wrap around the base. (I would think that cutting the fleece about 20 inches long or so would be more than enough) Smaller cuts of the fleece will be set aside for later.
Step Six: Secure the fleece
Once you wrap the fleece around the base and around the top of the boots, secure the ends together using a stapler and then glue the fleece in place. You can adjust the branches are necessary at this point.
Wrap the shorter pieces of fleece around the middle of the tree and connect the ends with a stapler. Tuck the fleece into the branches as this will help to secure it. You can then move the branches around as you would like.
Wrap the rest of the fleece around the top of the tree and connect the ends with a stapler. Again, use the branches to help hold the fleece from moving around.
Step Seven: Add the beanie
Add the black beanie to the top of your tree and tuck the fleece up inside the edges of the hat. Use a stapler to hold it into place.
Step Eight: Add the details
Cut red felt 2-inches in width and about 24 inches long. Cut some fringe on the ends at about 3 inches long and then wrap this around the bottom of the white fleece on top. This is the scarf for the snowman!
Next, cut a long triangle 4-inches in length with a width of 2-1/2 inches out of the orange piece of felt. Glue this to the front of the white felt on top, pointing to the side. This is the nose for your snowman.
Glue two buttons onto the front of the white felt just above the nose, making the eyes. Then glue the rest of the bottoms of the front in a row.
Add between 3-4 evergreen picks to the tree to bulk it up a bit. (this is optional) If you do decide to do it, use the floral wire to secure.
EASY KIT OPTION FOR MAKING YOUR SNOWMAN CHRISTMAS TREE
This is a simple kit option that you can purchase and use that will give you almost everything that you need! It isn’t the “exact” tree that you’d make, but it is a faster version to give you a fun and festive look!
SNOWMAN CHRISTMAS TREE PRINTABLE DIRECTIONS
You can print off the complete supplies and instructions for this adorable Snowman Christmas Tree via the how-to card below.
If you make and love this craft, let me know by leaving a 5-star rating on this how-to card! I would appreciate it more than you know!

How to Make a Snowman Christmas Tree
Equipment
- Scissors
- Stapler
Materials
- 1 Tabletop Christmas Tree
- 3-4 Evergreen Branch Picks or pine
- ¼ yd of fleece fabric white
- Scraps of felt fabric in Black Red, and Orange
- Ceramic Santa Boot Planter
- Rocks
- Cardboard
- Floral Wire
- Poly Fill
- 1-2 Sets Fairy Lights
- Black Baby Beanie Hat
- 6-7 Black Buttons 1-inch in size
- Glue
Instructions
- Grab the cardboard and cut it to fit on top of the rocks. Try to make it close to the size of the top of the boots and use it to create a flat surface. This will be what your tree sits on.

- Fill the planter with rocks. If you want to glue them to hold them in place, you can. Add a little bit of the Poly-Fil on top and add rocks around that.

- Glue the cardboard cut-out on top of the boots. Then put the bottom of the tree on top of the boots and glue it securely into place.

- Grab the fairy lights and put them around the bottom of three. Work your way up while wrapping them and make sure that you leave a switch for the lights behind the top of the boots.
- Using your scissors, cut the fleece into 1/8 yard width strips. Make sure that you cut one of the fleece to be long enough to wrap around the base. (I would think that cutting the fleece about 20 inches long or so would be more than enough) Smaller cuts of the fleece will be set aside for later.
- Once you wrap the fleece around the base and around the top of the boots, secure the ends together using a stapler and then glue the fleece in place. You can adjust the branches are necessary at this point.

- Wrap the shorter pieces of fleece around the middle of the tree and connect the ends with a stapler. Tuck the fleece into the branches as this will help to secure it. You can then move the branches around as you would like.
- Wrap the rest of the fleece around the top of the tree and connect the ends with a stapler. Again, use the branches to help hold the fleece from moving around.

- Add the black beanie to the top of your tree and tuck the fleece up inside the edges of the hat. Use a stapler to hold it into place.

- Cut red felt 2-inches in width and about 24 inches long. Cut some fringe on the ends at about 3 inches long and then wrap this around the bottom of the white fleece on top. This is the scarf for the snowman!
- Next, cut a long triangle 4-inches in length with a width of 2-1/2 inches out of the orange piece of felt. Glue this to the front of the white felt on top, pointing to the side. This is the nose for your snowman.
- Glue two buttons onto the front of the white felt just above the nose, making the eyes. Then glue the rest of the bottoms of the front in a row.
- Add between 3-4 evergreen picks to the tree to bulk it up a bit. (this is optional) If you do decide to do it, use the floral wire to secure.

If you loved learning how to make a snowman Christmas tree, be sure to check out these other great holiday ideas:
- Mickey Sock Snowman Craft (without rice!)
- Snowman Mickey Mouse Wreath DIY
- Grapevine Wreath Ornaments with free SVG file
Be sure to PIN this for LATER and SHARE on FACEBOOK!


Leave a Reply