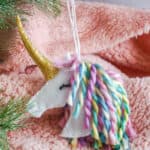
DIY Unicorn Christmas Ornament with Cricut
This fun DIY Unicorn Christmas Ornament is made using your Cricut and ends with an adorable felt ornament for your tree.
Yield: 1 Ornament
Equipment
- Cricut Explore Air2 or Cricut Maker
- Fabric or Light Grip Map
- Hot Glue Gun & Glue
- Pencil or Chopstick
- Parchment Paper
- Embroidery Thread Needle
Materials
- Craft Felt in White
- Small Amount of Polyfill
- Small Amount of Black Yarn or Embroidery Thread
- Rainbow Colored Yarn
- Gold Lame Fabric Scraps
- White Embroidery Thread
- Copy Paper
Instructions
- Start by making the unicorn horn. Place a small amount of polyfill in the center of the unicorn horn shape on the wrong side of the fabric. Wrap the horn shape around the polylfil and, using the hot glue or with a whip-stitch, create a seam along the join line of the horn.
- To make the closed eyes, use the hot glue to draw an eye shape on the parchment paper, then immediately place a line of black yarn or embroidery thread on the shape. You can use pliers or a needle to move the thread around a little to form the shape better before the glue cools. You can add more eyelashes or even make them super exaggerated then trim them to suit your unicorn when the glue is fully cooled (about 5 minutes).
- Cut out the eyes and then glue the eyes in place on the two unicorn head shapes, taking care to place them on the opposite sides from each other.
- Place the two unicorn head shapes together back to back and with the white embroidery thread, stitch around the outside edge of the two shapes along the lower face, neck, and base using a blanket stitch. Leave the forehead and all along the neck open. Stuff the unicorn head shape with the poly-fil.
- Place the horn into the open forehead area and whip-stitch it in place or glue in place.
- Cut yarn to length using the mane guide paper cutout. Insert about ¼ inch of the yarn in between the head shapes along the neck back and between the ears. Whip stitch or blanket stitch (whatever is easiest, because it won’t be visible) the two head shapes closed along the mane, through the mane, and securing the yarn in place. Tie off the thread and trim the end. Trim the mane as desired.
- Add a loop of yarn to the top of the head behind the ears to hang your ornament and enjoy it!